


Introduction
In my last post, we explored how to secure admin passwords and convert users to standard accounts on macOS. With this configuration, users may encounter permission prompts when apps request access to sensitive features like full disk access or screen recording. These prompts can disrupt the user experience - especially for standard users who lack the privileges to approve them. Apple enforces these permission requests for privacy reasons and only admins can grant access. To address this, Intune supports Privacy Preferences Policy Control (PPPC) profiles, which allow Intune admins to pre-configure and approve app permissions in advance. This ensures that newly deployed apps already have the correct permissions approved.
However, there are some caveats and limitations to be aware of - and this post will walk you through those as well.
Create a PPPC Configuration Policy in Intune
This post focuses on configuring the PPPC profile using the Settings Catalog, although there are other methods available as well. I prefer using the Settings Catalog to keep things clean, consistent and easily configurable.
Let’s walk through the process.
Step 1: Determine Application Requirements
Before creating a profile, you need to know exactly what permissions the app will request. Commonly requested services include:
- Full Disk Access
- Accessibility
- Calendar
- Reminders
- Photos
- Camera (No admin rights required)
- Microphone (No admin rights required)
- Screen Recording
You can gather this information by installing and launching the app, observing the system prompts, or reviewing any documentation provided by the software vendor.
Step 2: Collect Required Information
Once you know what access the application needs, the next step is gathering the specific application details Intune requires to configure the PPPC profile. This includes:
- Application Bundle Identifier: This is a unique identifier assigned to every app (e.g.,
com.microsoft.Outlook). - Code Requirement: A string that verifies the code signature of the app, typically including the Bundle Identifier.
There are several ways you can obtain this information:
- PPPC Utility: A free tool that displays the Bundle Identifier and Code Requirement information needed for the profile.
- Terminal Commands: You can also collect an app’s Bundle Identifier and Code Requirement information manually using macOS commands like
codesign -dr - /path/to/app.
I encountered a situation where Logitech Options+ had two different Bundle Identifiers. So, I needed to ensure I was using the correct one. To do this, you can follow the steps below:
- Go to Privacy & Security settings and select the required permission for the app. Then, right-click the app and choose Show in Finder.
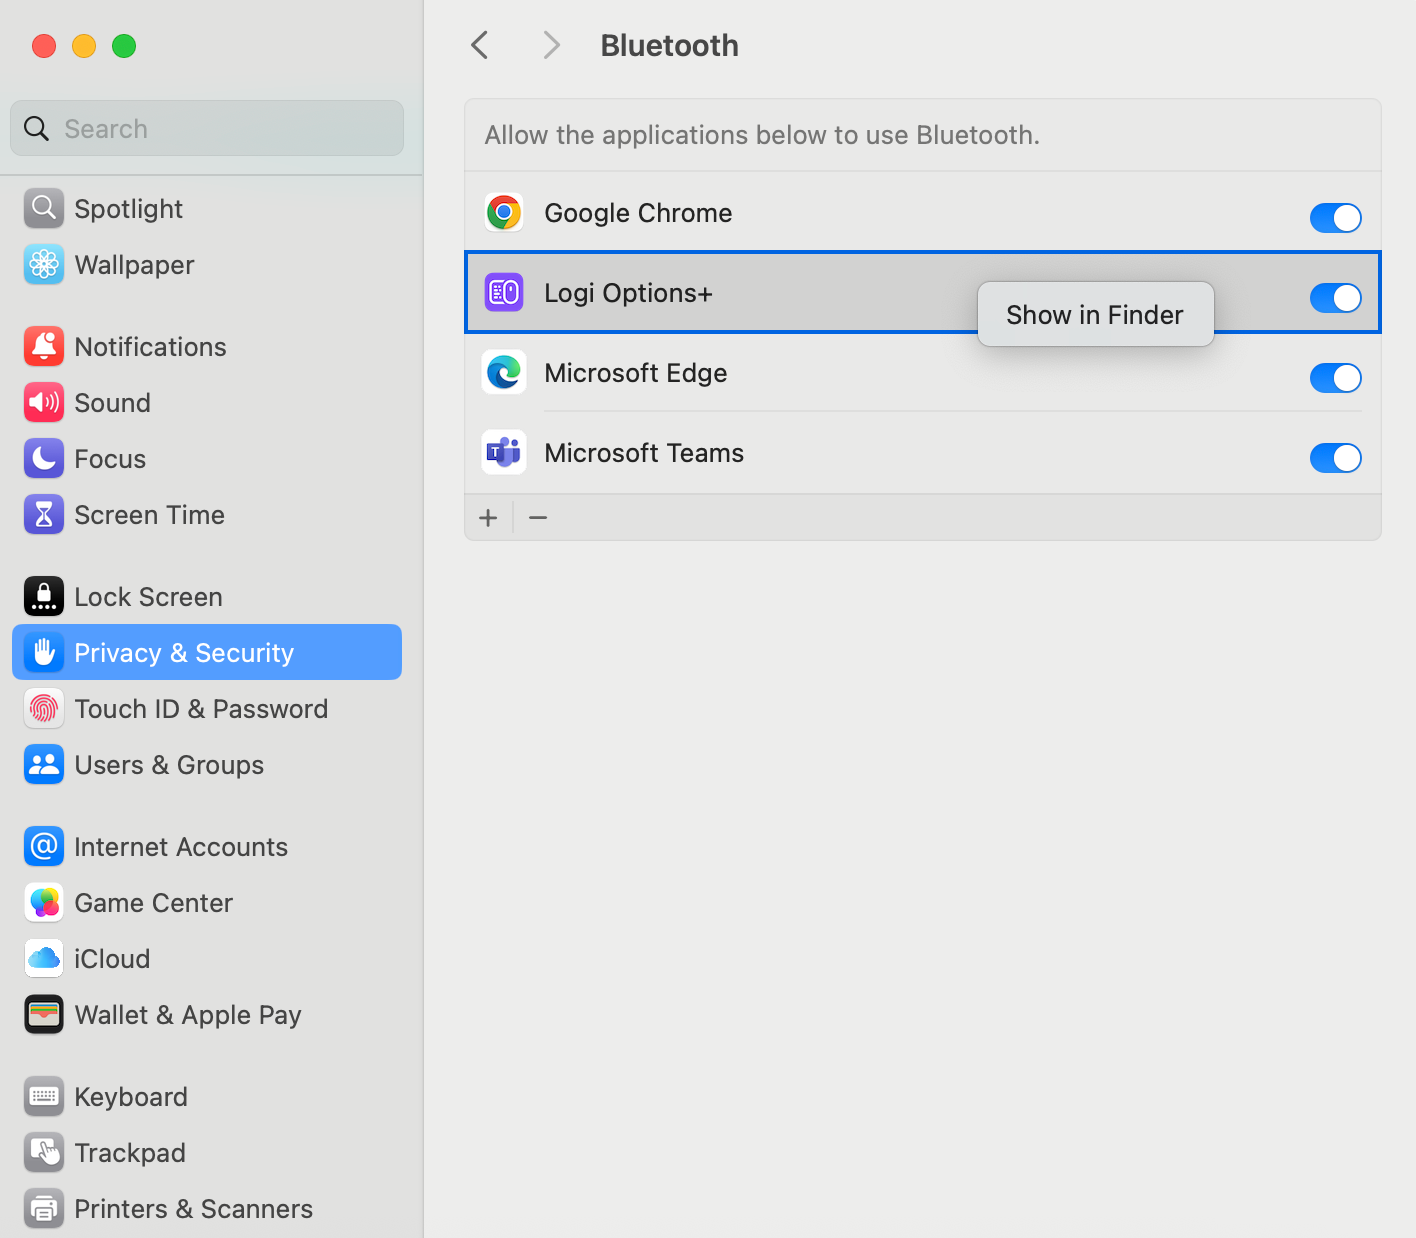
- Now you found the correct app location. Right-click the app while holding the Option key, then click Copy "[App Name]" as Pathname.

- Use the copied path in Terminal with the following command to retrieve the required information:
codesign -dr - /path/to/app - In this example, you’ll receive the following output:
Executable=/Library/Application Support/Logitech.localized/LogiOptionsPlus/logioptionsplus_agent.app/Contents/MacOS/logioptionsplus_agent
designated => identifier "com.logi.cp-dev-mgr" and anchor apple generic and certificate 1[field.1.2.840.113635.100.6.2.6] /* exists */ and certificate leaf[field.1.2.840.113635.100.6.1.13] /* exists */ and certificate leaf[subject.OU] = QED4VVPZWA
Bundle Identifier
com.logi.cp-dev-mgr
Code requirement
identifier "com.logi.cp-dev-mgr" and anchor apple generic and certificate 1[field.1.2.840.113635.100.6.2.6] /* exists / and certificate leaf[field.1.2.840.113635.100.6.1.13] / exists */ and certificate leaf[subject.OU] = QED4VVPZWA
Step 3: Create the Intune Configuration Profile
After collecting the required information, it’s time to build the PPPC profile in Intune:
- Navigate to Devices > macOS > Configuration > Create > New Policy.
- Select Settings catalog

- Name the policy
- Search for Privacy Preferences Policy Control to list all available services

- Select the required service
- Click on Edit instance to enter the details that you collected in Step 2
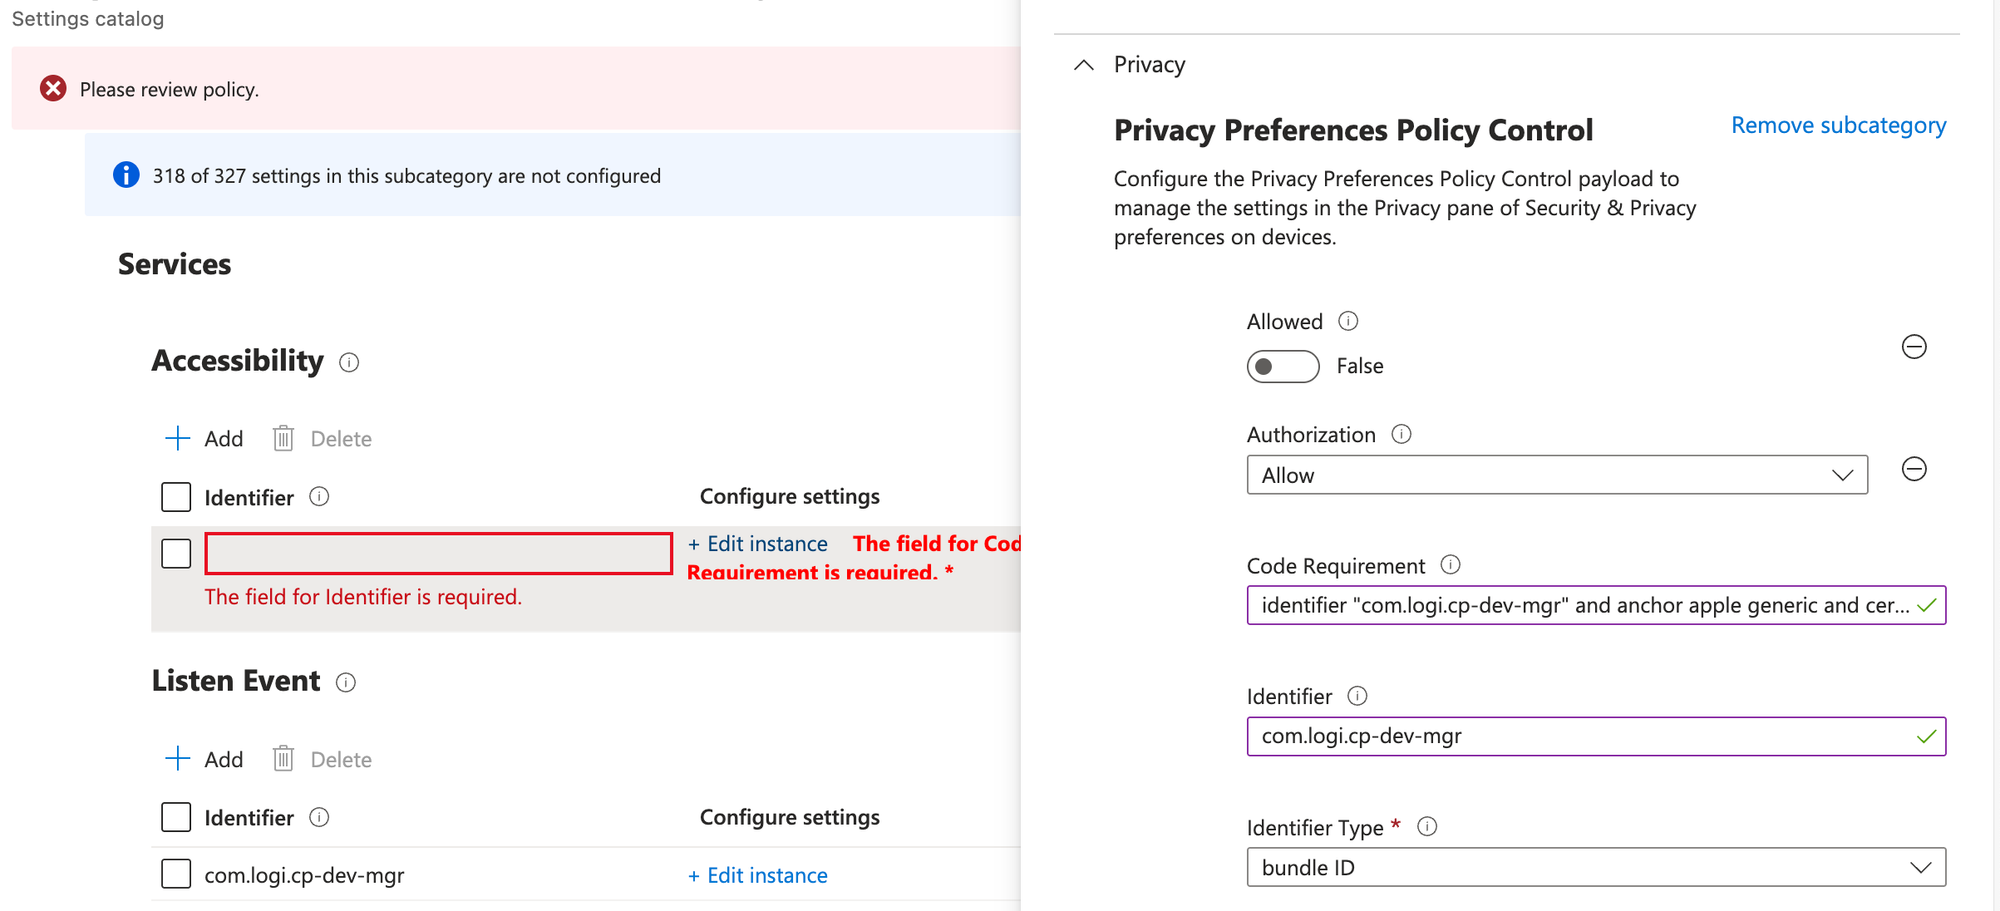
In the end, the settings should look like this:

- Assign the policy to your devices
For Camera and Microphone, only Deny is supported. Standard users can grant access themselves without admin rights, so there's no need to deploy the Allow setting.
For other services like Accessibility or Full Disk Access, you should use the Allow setting as usual.
Step 4: Monitor the Settings
After deploying the profile to devices, the next time they sync with Intune, the newly added profile will appear under the Device Management section in General Settings.
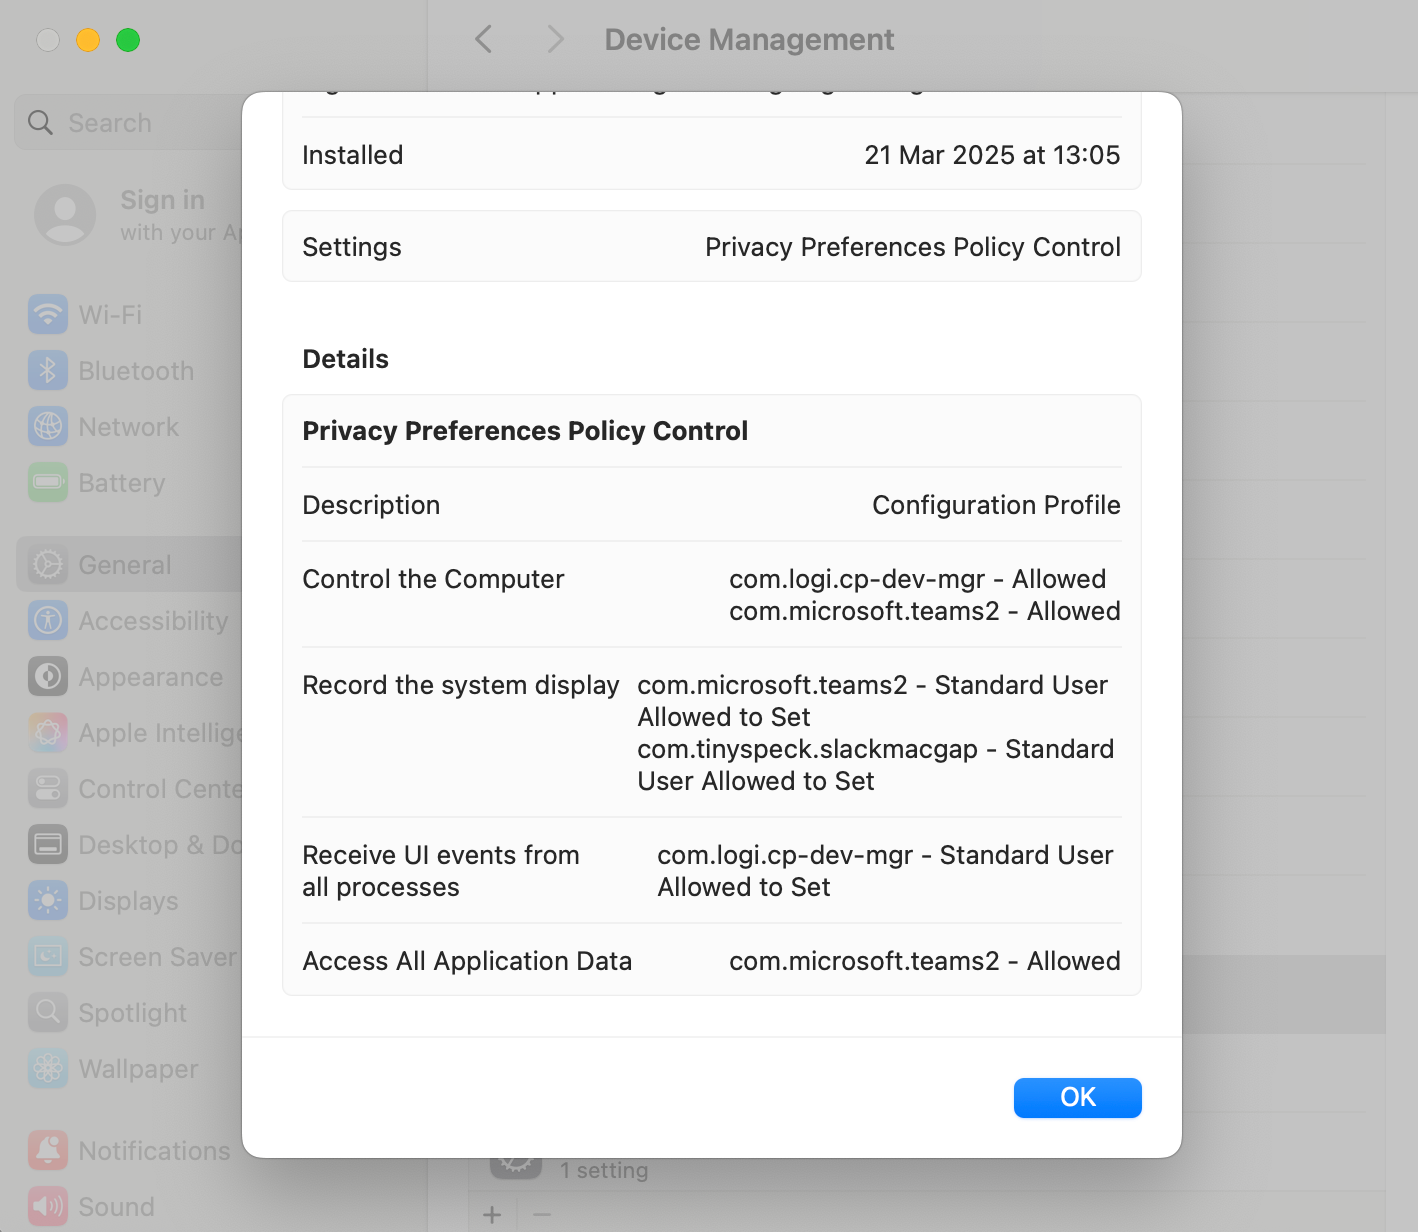
However, for Screen Recording permissions, the app will appear in the list. This happens because the option Allow Standard User to Set System Service was selected, which prompts users to approve the permission. As a result, you’ll find the app listed under System Settings > Privacy & Security > Screen Recording.
Some Tips
- Always test your PPPC profile on a pilot group before pushing it company-wide.
- Pay close attention to Bundle Identifiers and Code Requirements - even small typos will cause the profile to fail.
- Combine related permissions into a single profile where it makes sense to keep things organized.
Final Thoughts
Setting up PPPC profiles in Intune may seem tricky at first, but once you understand what’s needed, it’s a straightforward way to manage macOS app permissions. With a bit of upfront work, you’ll avoid a flood of user permission prompts and make life easier for everyone.


Member discussion